Install PixieGateway
Local Install
If you want to demo PixieApp publishing locally, follow these instructions. If you’d rather deploy your application to the cloud, see the section below on using Kubernetes on Bluemix.
To start, install the pixiegateway package from PyPi. On the command line, run the following: (Note: PixieGateway supports both Python 2.7 and 3.x)
pip install pixiegateway
Then you can start the PixieGateway with a simple command:
jupyter pixiegateway --port <portnumber>
Example output:
dtaieb$ jupyter pixiegateway --port 8899
[PixieGatewayApp] Kernel started: b5be0b3b-a018–4ace-95d1-d94b556a0bfe
kernel client initialized
[PixieGatewayApp] Jupyter Kernel Gateway at http://127.0.0.1:8899
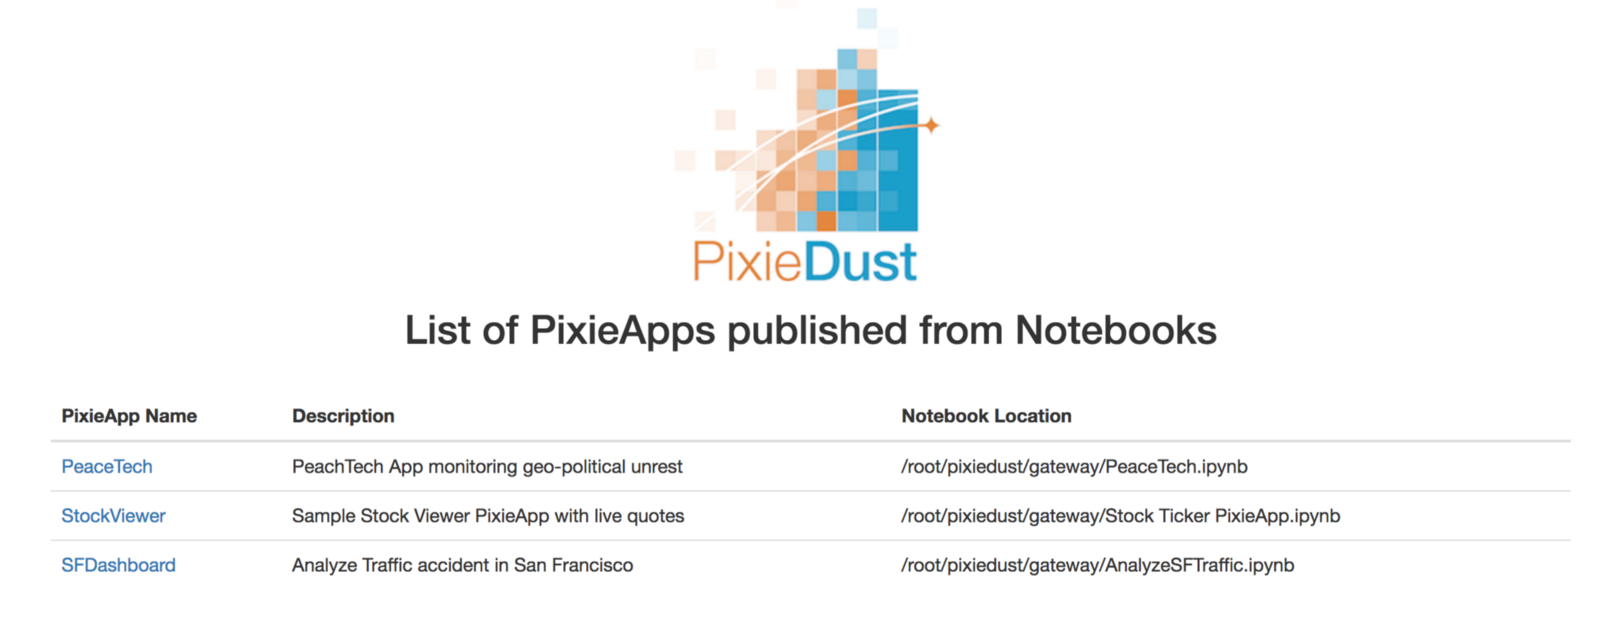
Now, go to http://localhost:<portnumber>/pixieapps to review and use your apps.
[optional] Running PixieGateway in Kubernetes on IBM Bluemix
If you’re new to Kubernetes on the IBM Bluemix container service, read this intro article that explains the basics of using the service with the bx and kubectl command-line tools.
Here are the steps to install PixieGateway using Kubernetes on Bluemix:
- Download the Kubernetes CLI and the Bluemix CLI.
bx login [-sso] -a https://api.ng.bluemix.netbx target -o <YOUR_ORG> -s <YOUR_SPACE>bx plugin install container-service -r Bluemixbx cs init- If not already done, create a cluster:
bx cs cluster-create --name my-cluster - Verify that the cluster is correctly created (this may take a few minutes):
bx cs clusters - Download the cluster config:
bx cs cluster-config my-cluster - Run the export command returned by the command above, e.g.,
export KUBECONFIG=/Users/dtaieb/.bluemix/plugins/container-service/clusters/davidcluster/kube-config-hou02-davidcluster.yml - Create the deployment:
kubectl create -f https://github.com/ibm-watson-data-lab/pixiegateway/raw/master/etc/deployment.yml - Create the service:
kubectl create -f https://github.com/ibm-watson-data-lab/pixiegateway/raw/master/etc/service.yml - Verify the pods:
kubectl get pods - Verify the nodes:
kubectl get nodes - Verify the services:
kubectl get services - Finally, you can get the public ip address of the server:
bx cs workers my-cluster

- To check that the install worked, enter the following URL in your browser:
http://<publicIP>:32222/pixieapps. You’ll be able to interact with your PixieApp-published web apps from there.
- Optional: In the future, if you need to update the PixieGateway version, you do not have to retrace the previous steps. Instead, simply delete the Kubernetes pod, which will cause Docker to restart and automatically pull down a new version of PixieDust, like so:
kubectl delete pod <name>. Here,<name>is the pod’s name obtained with the command:kubectl get pods.
Note
The deployed PixieApps are not stored in a persisted volume, so deleting the pod will also delete them, and you’ll have to re-publish.